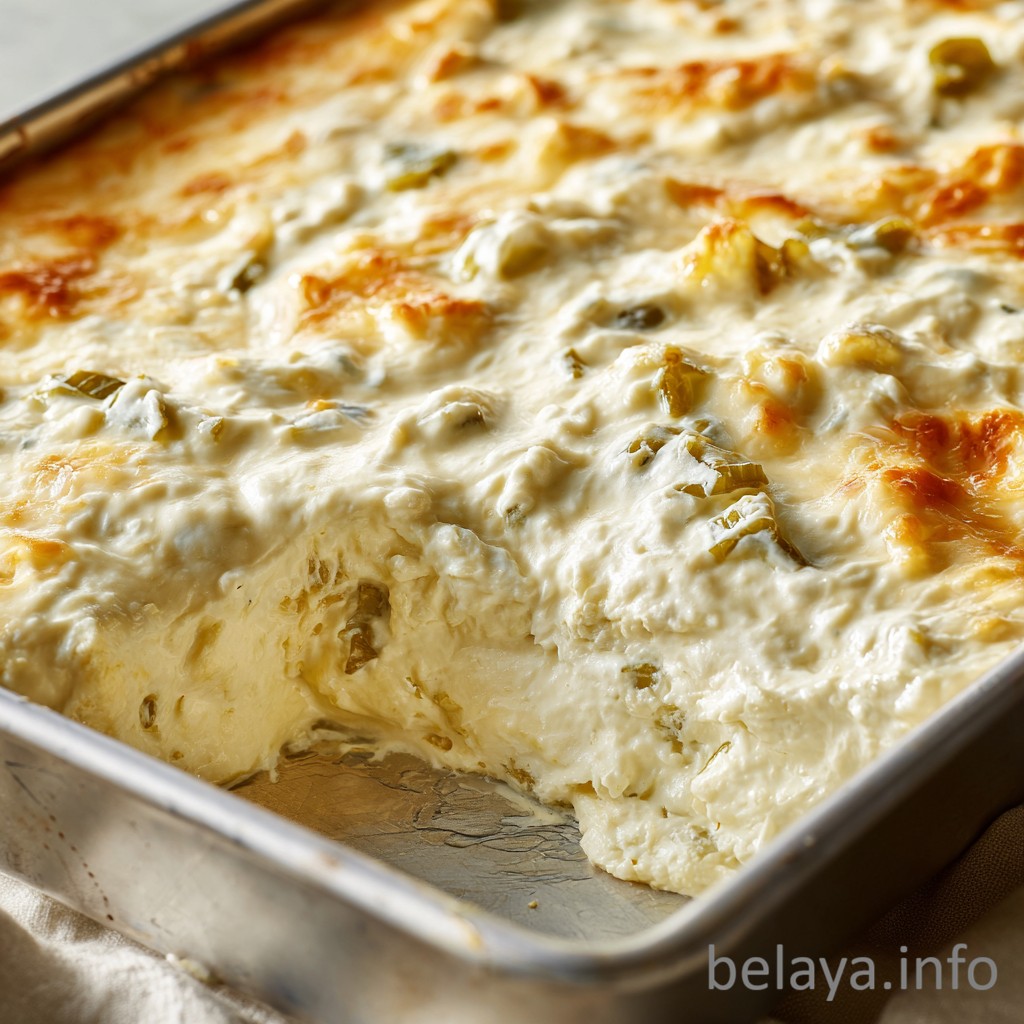
Hatch Chile Dip
Hatch Chile Dip is a warm, creamy appetizer that highlights the bold, earthy flavor of green chiles in a rich and comforting way.
Known for their distinctive taste and gentle heat, Hatch chiles bring a slightly smoky, mildly spicy character that blends beautifully with creamy ingredients like sour cream, mayonnaise, and melted cheeses. As the dip bakes, the flavors meld together into a smooth, savory mixture with a lightly golden, cheesy crust on top.
What makes this recipe especially appealing is its simplicity and depth of flavor. The creamy base balances the natural heat of the chiles, while mozzarella and Parmesan create a rich, melty texture that’s perfect for dipping.
Served hot with crunchy tortilla chips or crackers, Hatch Chile Dip becomes an irresistible crowd-pleasing snack—ideal for gatherings, game days, or any occasion where comforting, shareable food takes center stage.
Why People Will Love Hatch Chile Dip
Rich, Creamy Comfort in Every Bite
The combination of mayonnaise, sour cream, and melted cheeses creates a luxuriously creamy texture that makes every scoop smooth, warm, and satisfying. It’s the kind of comforting dip that feels indulgent and cozy.
Unique Flavor from Hatch Green Chiles
Hatch chiles are known for their distinctive earthy, slightly smoky flavor and gentle heat. They add a bold Southwestern character that makes this dip more interesting than a typical cheese dip.
Perfect Balance of Creamy and Spicy
The creamy base softens the heat of the chiles, creating a balanced flavor profile that is rich without being overwhelming. This harmony makes the dip appealing even to people who normally avoid very spicy foods.
Golden, Cheesy Crust on Top
The Parmesan cheese baked on top forms a lightly crisp, golden layer that adds both flavor and texture. This contrast between the bubbly interior and the slightly crisp topping makes the dip especially satisfying.
Simple Ingredients with Big Flavor
Despite its rich taste, the recipe uses a short list of everyday ingredients that are easy to find. The simplicity allows the natural flavor of the chiles and cheeses to shine.
Perfect for Parties and Gatherings
Warm, cheesy dips are always crowd favorites. Served with tortilla chips or crackers, this dip is easy to share and perfect for game days, holidays, or casual get-togethers.
Quick and Easy to Prepare
The recipe requires minimal preparation—simply mix the ingredients, bake, and serve. This makes it ideal for busy cooks who want a flavorful appetizer without complicated steps.
Versatile Serving Options
While delicious with chips, the dip can also be served with toasted bread, vegetable sticks, or even used as a topping for baked potatoes, tacos, or grilled meats.
Customizable Heat Level
Using mild or hot green chiles allows you to control the spice level. You can also mix different types of chiles to create a flavor that suits your preference.
Warm and Comforting Flavor Profile
The combination of creamy dairy, savory spices, and roasted chile flavor creates a dip that feels hearty, satisfying, and deeply comforting—perfect for relaxing meals and shared moments around the table.
Key Ingredients:
Diced Green Chiles (Hatch-Style)
Green chiles are the defining ingredient of this dip. Known for their slightly smoky, earthy flavor and gentle heat, they bring a distinctive Southwestern character to the dish. Their natural brightness balances the richness of the creamy base.
Mayonnaise
Mayonnaise contributes a smooth, velvety richness that helps bind the ingredients together. Its mild tanginess enhances the flavor of the chiles while giving the dip a luxurious, creamy texture.
Sour Cream
Sour cream adds a subtle tang that lightens the richness of the cheese and mayonnaise. It creates a balanced, creamy base that keeps the dip from feeling overly heavy.
Mozzarella Cheese
Mozzarella melts beautifully, creating the smooth, stretchy texture that makes this dip so satisfying. Its mild flavor allows the chiles and seasonings to stand out while still adding creamy richness.
Parmesan Cheese
Parmesan brings a slightly salty, nutty flavor that deepens the overall taste of the dip. When baked on top, it forms a lightly golden crust that adds both texture and savory complexity.
Garlic Powder
Garlic powder provides subtle aromatic depth that enhances the savory profile of the dip without overpowering the chiles.
Salt and Black Pepper
These basic seasonings help highlight the natural flavors of the chiles and cheeses, ensuring the dip tastes well balanced and flavorful.
Tortilla Chips or Crackers (For Serving)
While not part of the dip itself, sturdy chips or crackers are essential for enjoying it. Their crisp texture contrasts beautifully with the warm, creamy dip, making each bite satisfying.
Expert Tips:
Drain the Chiles Well Before Mixing
Canned green chiles often contain excess liquid. Draining them thoroughly prevents the dip from becoming watery and helps maintain a thick, creamy consistency once baked.
Use Freshly Shredded Cheese When Possible
Shredding mozzarella and Parmesan yourself can improve the texture of the dip. Pre-shredded cheeses sometimes contain anti-caking agents that prevent smooth melting and can slightly affect the creaminess.
Balance the Creamy Base Carefully
The combination of mayonnaise and sour cream creates a rich texture, but the balance matters. Mixing them thoroughly before adding other ingredients ensures a smooth base and evenly distributed flavor.
Taste the Mixture Before Baking
Since the dip contains several savory ingredients, tasting the mixture before it goes into the oven allows you to adjust the seasoning. You can add more garlic powder, pepper, or even extra chiles depending on your taste preference.
Choose the Right Baking Dish
A shallow baking dish works best because it allows the dip to heat evenly and develop a lightly golden surface. If the dip is too deep in the dish, the top may brown before the center becomes hot.
Bake Until Bubbling, Not Overcooked
The goal is to heat the dip until it becomes hot and bubbly with a lightly golden top. Overbaking can cause the cheese to separate or the dip to become too thick.
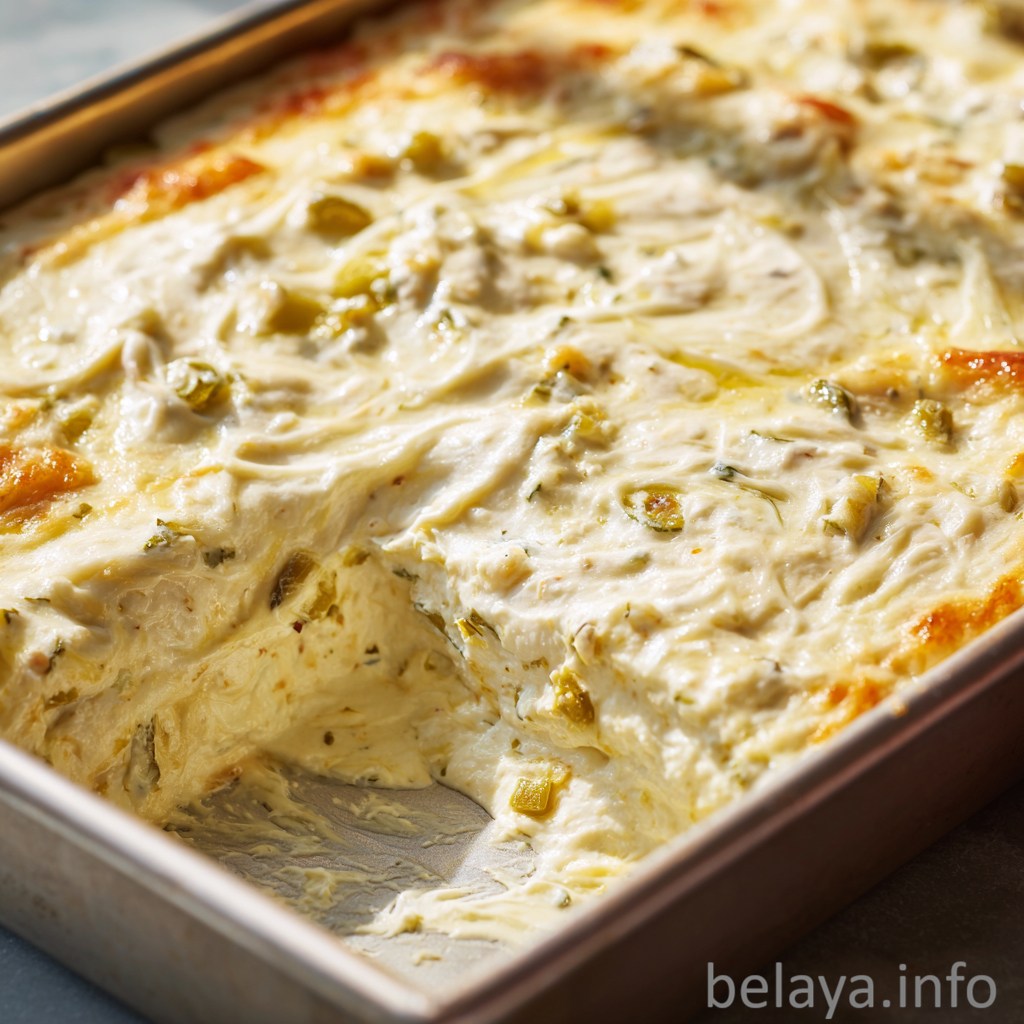
Let the Dip Rest for a Few Minutes After Baking
Allow the dip to sit for about 3–5 minutes before serving. This helps the ingredients settle and slightly thickens the texture, making it easier to scoop with chips or crackers.
Customize the Heat Level Easily
If you enjoy more spice, consider mixing mild and hot green chiles or adding a small amount of diced fresh jalapeño. For a milder version, use only mild chiles.
Add Extra Texture if Desired
Some cooks like to mix in extras such as crispy bacon bits, diced roasted peppers, or chopped green onions for additional flavor and texture.
Serve the Dip While Warm for the Best Experience
Hatch Chile Dip is most enjoyable when served warm and creamy. As it cools, the cheese will firm up slightly, so keeping it warm ensures the smoothest texture and richest flavor.
Hatch Chile Dip
Ingredients
3 cans (4 oz each) diced green chiles, drained (use mild, hot, or a mix depending on your heat preference)
1 cup mayonnaise
1 cup sour cream
2½ cups mozzarella cheese, shredded
1 teaspoon salt
1 teaspoon freshly ground black pepper
1 teaspoon garlic powder
½ cup Parmesan cheese, finely grated
Tortilla chips or crackers, for serving
Instructions:
Step 1: Preheat the Oven
Set your oven to 350°F (175°C) so it is fully heated and ready before baking the dip.
Step 2: Combine the Ingredients
In a large mixing bowl, add the diced green chiles, mayonnaise, sour cream, shredded mozzarella cheese, salt, black pepper, and garlic powder.
Stir everything together until the mixture is evenly blended and creamy.
Step 3: Prepare the Baking Dish
Spoon the mixture into a square baking dish and spread it out evenly.
Sprinkle the grated Parmesan cheese over the top to create a flavorful, golden crust while baking.
Step 4: Bake the Dip
Place the dish in the preheated oven and bake for 30–34 minutes, or until the dip becomes hot, bubbly, and lightly golden on top.
Step 5: Serve
Remove the dip from the oven and serve it warm with chips or crackers for dipping.
Important Notes When Making Hatch Chile Dip
The Type of Green Chiles Affects the Flavor
Hatch-style green chiles are known for their unique earthy flavor and mild smokiness. Using mild, hot, or a combination of both allows you to control the heat level while still preserving the characteristic chile flavor that defines this dip.
Properly Draining the Chiles Is Essential
Excess liquid from canned chiles can make the dip thin or watery during baking. Draining them well ensures the dip remains thick, creamy, and easy to scoop with chips or crackers.
The Creamy Base Creates the Dip’s Texture
The combination of mayonnaise and sour cream forms the foundation of the dip’s rich, smooth consistency. These ingredients work together to balance the heat of the chiles while helping the cheese melt evenly.
Mozzarella Provides Meltability While Parmesan Adds Flavor
Mozzarella contributes the smooth, stretchy texture inside the dip, while Parmesan adds a slightly salty, nutty flavor and creates a lightly crisp topping during baking.
Seasoning Should Be Balanced Carefully
Because cheeses and chiles can already contain some natural salt, it’s best to taste the mixture before baking and adjust seasoning gradually to avoid making the dip overly salty.
A Shallow Dish Helps the Dip Cook Evenly
Spreading the mixture in a relatively shallow baking dish helps the dip heat evenly and allows the Parmesan topping to develop a lightly golden surface.
The Dip Will Thicken as It Cools
Once removed from the oven, the cheese and creamy ingredients will continue to thicken slightly as they cool. Letting the dip rest briefly before serving improves its texture and makes it easier to scoop.
This Recipe Is Easy to Customize
Additional ingredients such as diced roasted peppers, chopped green onions, or crispy bacon can be added to create variations while still maintaining the classic creamy chile base.
Best Served Warm for Maximum Creaminess
Hatch Chile Dip tastes best when it is warm and freshly baked. The cheeses are fully melted and the flavors are at their most balanced at this stage.
Ideal for Sharing and Entertaining
Because it is easy to prepare and serves well with chips or crackers, this dip is especially popular for gatherings, game days, and casual parties where warm, comforting appetizers are appreciated.
How to Enjoy Hatch Chile Dip After Cooking
Allow the Dip to Rest Briefly After Baking
Once the dip comes out of the oven, let it rest for about 3–5 minutes. This short resting time allows the melted cheeses to settle and slightly thicken, making the dip easier to scoop while still staying creamy and warm.
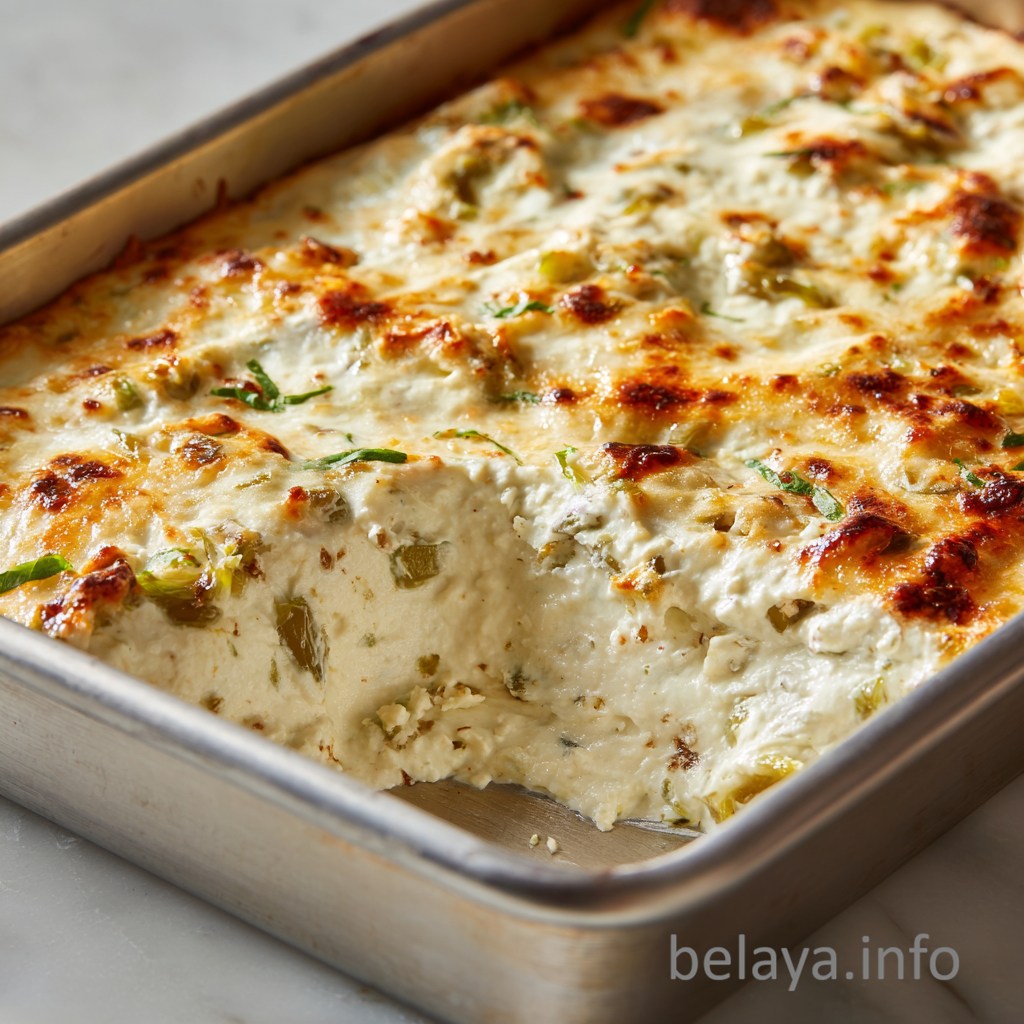
Stir Gently Before Serving (Optional)
If the dip has developed a golden crust on top, you can gently stir it to blend the melted cheese throughout the dish. This creates an even creamier texture, though some people prefer to keep the golden top intact for extra flavor.
Serve While Warm and Creamy
Hatch Chile Dip is best enjoyed fresh from the oven while it is still hot and bubbling. At this stage, the cheese is perfectly melted and the flavors of the chiles and seasonings are at their most vibrant.
Pair with the Right Dippers
Tortilla chips are the classic choice because their sturdy texture holds up well to the thick, creamy dip. Crackers, toasted baguette slices, or even pita chips also work beautifully.
Add Fresh Garnishes for Flavor Contrast
For extra freshness, sprinkle chopped green onions, cilantro, or diced fresh tomatoes on top. These bright toppings add color and balance the richness of the dip.
Create a Complete Appetizer Spread
This dip pairs well with other party snacks such as guacamole, salsa, or fresh vegetable sticks. Offering a variety of textures and flavors makes it perfect for gatherings or game-day tables.
Enjoy as a Topping for Other Foods
Hatch Chile Dip can also be used creatively beyond chips. Try spooning it over baked potatoes, grilled chicken, tacos, or roasted vegetables for an extra layer of creamy flavor.
Keep the Dip Warm for Gatherings
If serving at a party, you can transfer the dip to a small slow cooker or warming dish to keep it warm and creamy for a longer time.
Reheat Leftovers Gently
If you have leftovers, store them in an airtight container in the refrigerator. When reheating, warm the dip slowly in the oven or microwave, stirring occasionally to restore its creamy consistency.
Enjoy the Balance of Creamy and Spicy Flavors
Take a moment to appreciate the contrast between the smooth cheese mixture and the mild heat of the green chiles. This balance is what makes Hatch Chile Dip such a comforting and flavorful appetizer.
Nutrition Information
Yields: 8 servings
Serving Size: about ¼ cup dip (without chips or crackers)
Calories: 260 kcal | Total Fat: 21 g | Saturated Fat: 9 g | Monounsaturated Fat: 7 g | Polyunsaturated Fat: 3 g | Cholesterol: 45 mg | Sodium: 420–520 mg (depending on cheese and added salt) | Total Carbohydrates: 5 g | Dietary Fiber: 0.6 g | Sugars: 2 g | Protein: 9 g
Frequently Asked Questions:
What are Hatch chiles and can I substitute them?
Hatch chiles are green chiles grown in the Hatch Valley of New Mexico, known for their distinctive earthy flavor and mild smokiness. If Hatch chiles are unavailable, you can substitute with canned diced green chiles or roasted Anaheim peppers for a similar taste.
Can I make this dip ahead of time?
Yes. You can prepare the dip mixture a day in advance and store it covered in the refrigerator. When ready to serve, transfer it to a baking dish and bake until hot and bubbly. This makes it a convenient appetizer for gatherings or parties.
How spicy is this dip?
The spice level depends on the type of green chiles used. Mild chiles create a gentle heat, while hot varieties provide a stronger kick. You can mix both types to achieve a balanced level of spice.
Can I use different cheeses in this recipe?
Yes, the cheese combination can be adjusted. While mozzarella provides a smooth melt and Parmesan adds savory depth, you could also add cheddar, Monterey Jack, or pepper jack for a different flavor profile.
What are the best foods to serve with Hatch Chile Dip?
This dip pairs well with tortilla chips, crackers, toasted baguette slices, or pita chips. It can also be served with fresh vegetables such as celery sticks, bell pepper strips, or cucumber slices for a lighter option.
Why should the green chiles be drained before mixing the dip?
Draining the chiles removes excess liquid that could make the dip thin or watery during baking. Properly drained chiles help the dip maintain a thick, creamy texture and allow the cheeses to melt evenly.
How do I ensure the dip has a smooth and creamy consistency?
Make sure the mayonnaise, sour cream, and shredded cheeses are mixed thoroughly before baking. This helps distribute the ingredients evenly so the dip melts together smoothly instead of forming pockets of cheese or separated liquid.
Can I prepare the dip mixture ahead of time and bake it later?
Yes. The entire mixture can be assembled in the baking dish, covered, and stored in the refrigerator for several hours or even overnight. When ready to serve, simply bake it until hot and bubbly.
How do I know when the dip is fully cooked?
The dip is ready when the edges begin to bubble and the top develops a light golden color from the melted Parmesan cheese. The center should be hot and creamy throughout.
What is the best type of baking dish to use for this dip?
A shallow baking dish works best because it allows the dip to heat evenly and helps create a lightly golden surface. If the dish is too deep, the center may take longer to warm while the top browns too quickly.