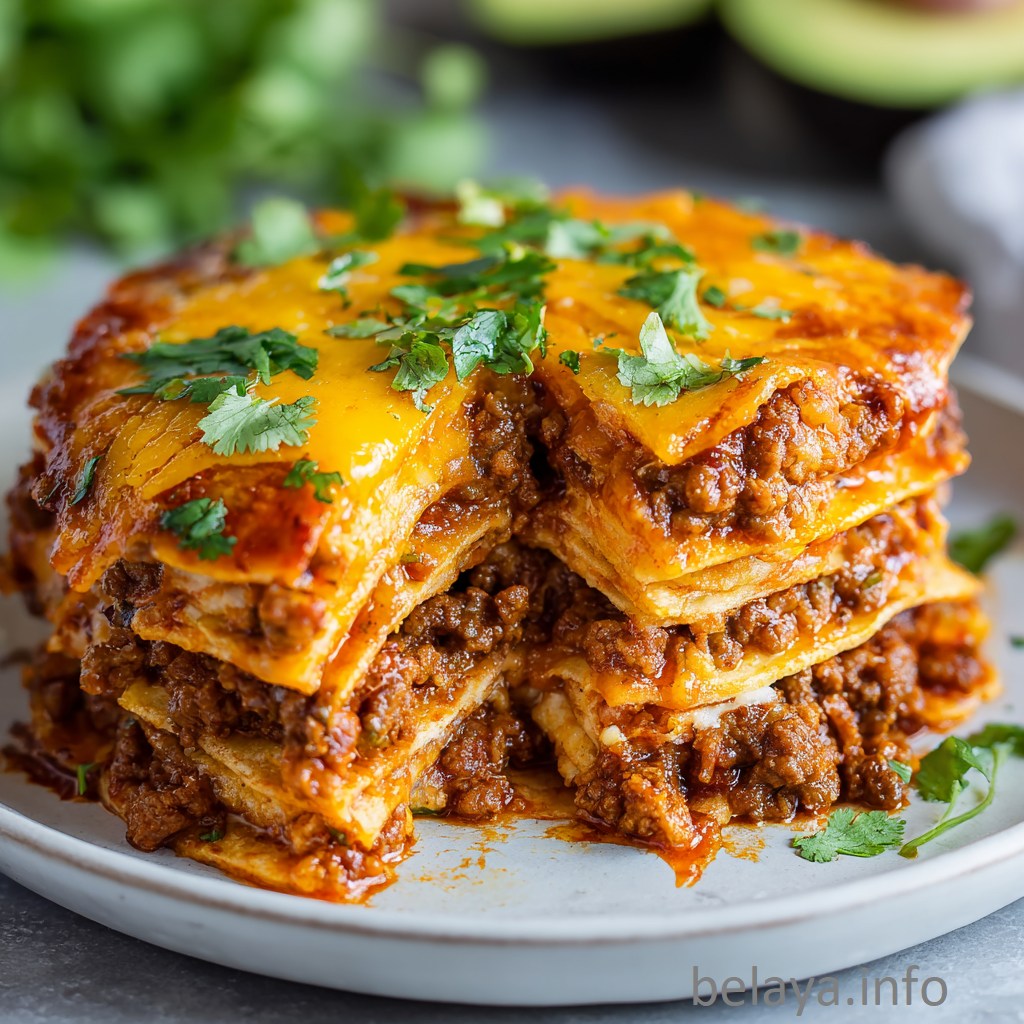
Beef Enchilada Stacks
Layers of warm tortillas, juicy seasoned beef, and creamy melted cheese come together in this comforting Beef Enchilada Stacks recipe — a hearty twist on the classic enchilada bake.
Instead of rolling each tortilla, you’ll stack them tall and generous, letting the flavors meld into irresistible, saucy layers. Every bite delivers the perfect balance of tender meat, smoky chiles, tangy enchilada sauce, and gooey cheese.
It’s weeknight-friendly yet special enough for a crowd, capturing the soul of Southwestern comfort food in one sizzling, oven-baked dish.
Why People Will Love This Beef Enchilada Stacks Recipe:
Layered Comfort in Every Bite – The stacked format allows flavors to melt into each other, delivering a perfect balance of tender beef, smoky green chiles, tangy enchilada sauce, and gooey cheese in every forkful.
Effortless Elegance – No need to roll each tortilla individually; this stacking method saves time while still presenting beautifully on the table.
Customizable to Taste – Easily swap cheeses, adjust spice levels, or add vegetables and toppings to suit different palates and dietary needs.
Family-Friendly & Crowd-Pleasing – Its hearty layers and bold Tex-Mex flavors appeal to both kids and adults, making it a reliable dinner for gatherings or weeknights.
Satisfyingly Filling – The combination of protein-rich beef, wholesome tortillas, and melted cheese creates a deeply satisfying meal that feels indulgent yet balanced.
Key Ingredients:
Ground Beef (1½ pounds, lean) – Forms the hearty, protein-packed base, offering rich, savory depth that carries the Tex-Mex flavors.
White Onion (½ large, finely diced) – Adds subtle sweetness and aromatic balance, enhancing the meat’s flavor.
Diced Green Chiles (4 ounces) – Brings gentle Southwestern heat and tangy brightness without overwhelming spice.
Enchilada Sauce (2 cups total, divided) – The soul of the dish, infusing each layer with smoky, tangy, and mildly spicy notes.
Shredded Cheese (1½ cups) – Melts into creamy, gooey layers, binding the stack together and adding indulgent richness.
Tortillas (8 almond flour or low-carb) – Provide the soft, layered structure while keeping the recipe adaptable to dietary preferences.
Expert Tips:
Choose quality beef for best flavor – Use lean, grass-fed ground beef if possible. It gives a cleaner taste and produces less grease, allowing the enchilada flavors to shine without excess heaviness.
Balance moisture in the filling – If your beef mixture looks too wet, simmer for a few minutes before layering to prevent soggy tortillas. Conversely, if it’s too dry, add a splash of extra enchilada sauce or broth for juiciness.
Warm tortillas before layering – Briefly heating the tortillas in a skillet or microwave makes them more pliable and less likely to crack during assembly.
Layer cheese strategically – Use a light sprinkle between layers for cohesion, but save the largest portion for the top to create that golden, bubbly crust.
Rest before slicing – Let the stacks sit for 5 minutes after baking. This helps the layers set, making them easier to slice neatly and serve without collapsing.
Beef Enchilada Stacks
Ingredients
Ground Beef – 1½ pounds, preferably lean, for a hearty and flavorful filling.
White Onion – ½ large, finely diced, to add sweetness and depth.
Diced Green Chiles – 4 ounces, for a mild kick of Southwestern heat.
Enchilada Sauce – 2 cups total, divided; homemade or quality store-bought works well.
Shredded Cheese – 1½ cups, such as sharp cheddar, Mexican blend, or your favorite melty cheese.
Tortillas – 8 almond flour tortillas or another preferred low-carb variety, soft and pliable.
Instructions
1. Prep the oven & baking dish
Preheat your oven to 375°F (190°C).
Lightly grease an 11″ x 15″ baking dish with a thin layer of avocado oil, just enough to coat the surface.
Set aside while the oven heats.
2. Cook the beef filling
Place a large skillet over medium to medium-high heat. Add the ground beef and cook, breaking it apart with a spatula, until browned and fully cooked through, about 5–7 minutes.
Stir in the diced onion and sauté for another 2 minutes, or until softened. If desired, drain excess fat (I usually keep it for extra flavor).
Mix in the diced green chiles and 1½ cups of enchilada sauce, stirring until everything is evenly coated. Remove from heat.
3. Build the base layer
Spread ¼ cup of enchilada sauce onto the bottom of the prepared baking dish, placing it roughly where the two enchilada stacks will sit.
Lay two tortillas in the dish to form the first layer.
4. Layer it up
Spoon a portion of the beef mixture onto each tortilla, then sprinkle with a small handful of shredded cheese.
Repeat this sequence—tortilla, beef mixture, cheese—until you have three full layers per stack.
5. Finish the stacks
Top each stack with a final tortilla.
Spread the remaining ¼ cup of enchilada sauce over the tops, then sprinkle generously with cheese.
If you’d like, scatter on sliced black olives for extra flavor and presentation.
6. Bake until melty
Transfer the baking dish to the oven and bake for 15–20 minutes, or until the cheese is fully melted and the stacks are heated through.
7. Serve & enjoy
Slice the stacks into wedges and serve hot, topped with your favorite garnishes such as lactose-free sour cream, avocado slices, and fresh cilantro.
Important Notes:
Sauce consistency matters – If using homemade enchilada sauce, ensure it’s not too watery; overly thin sauce can make the stacks soggy, while overly thick sauce may not soak into the tortillas properly.
Tortilla choice impacts texture – Almond flour tortillas keep the dish low-carb but can be softer than traditional flour tortillas; handle gently to avoid tearing during assembly.
Layer evenly for stability – Distribute the beef mixture and cheese evenly across each layer so the stacks bake uniformly and hold their shape when sliced.
Watch oven timing closely – Every oven varies; check at the 15-minute mark to avoid over-browning the cheese or drying out the top layer.
Customizable garnishes – Fresh toppings like avocado, cilantro, and sour cream not only add flavor but also balance the richness, so don’t skip them for the best eating experience.
How to Enjoy Beef Enchilada Stacks After Cooking
Let it Rest for a Few Minutes – Fresh from the oven, the stacks are bubbling hot. Allowing them to sit for 5–7 minutes helps the layers firm up, making slicing easier while keeping the fillings intact.
Slice with Intention – Use a sharp, serrated knife to cut clean wedges, much like slicing a layered cake. This keeps the tortillas from tearing and ensures every piece gets an even share of beef, cheese, and sauce.
Plate for Balance – Serve each portion with a side of fresh garnishes. A dollop of cool sour cream, creamy avocado slices, and a sprinkle of chopped cilantro not only brighten the flavors but also balance the richness.
Pair with Complementary Sides – For a full meal, add sides that contrast the stacks’ hearty texture: a crisp green salad with lime vinaigrette, charred street corn, or Mexican-style rice.
Enjoy with the Right Temperature – This dish shines warm and melty, but avoid serving it piping hot; slightly cooled cheese has more pull and the flavors meld better.
Mind the Leftovers – If you have extras, reheat in the oven at 350°F (175°C) until warmed through for the best texture. Microwaving works in a pinch but can make tortillas softer.
Nutrition Information
Per serving (based on dividing the full recipe into 8 equal portions)
Calories: 355 kcal | Total Fat: 22.7 g | Saturated Fat: 9.8 g | Monounsaturated Fat: 8.5 g | Polyunsaturated Fat: 1.7 g | Cholesterol: 82 mg | Sodium: 685–750 mg (depending on sauce and cheese used) | Total Carbohydrates: 14.6 g | Dietary Fiber: 7.1 g | Sugars: 2.8 g | Protein: 26.3 g
Frequently Asked Questions:
Can I make this recipe ahead of time?
Absolutely. You can fully assemble the stacks, cover them tightly with foil or plastic wrap, and refrigerate for up to 24 hours before baking.
When ready, bake at 375°F (190°C) for an additional 5–7 minutes to account for the chilled ingredients. This makes it perfect for meal prep or hosting.
What’s the best way to make it gluten-free?
Simply use gluten-free tortillas—corn tortillas or certified gluten-free flour tortillas work well. Also, make sure your enchilada sauce is gluten-free, as some store-bought brands use wheat flour as a thickener.
Can I freeze Beef Enchilada Stacks?
Yes, but with a tip: freeze them before baking for the best texture. Assemble as directed, wrap tightly in plastic wrap and foil, and freeze for up to 2 months.
Thaw in the refrigerator overnight before baking, then cook as usual.
How can I make this dish more nutritious?
Add extra veggies like sautéed zucchini, mushrooms, or spinach to the beef filling.
You can also use whole-grain or high-fiber tortillas, lean ground beef or ground turkey, and a reduced-fat cheese blend to lighten it up without sacrificing flavor.
What are the best garnishes for serving?
Classic options include fresh cilantro, diced avocado, lactose-free sour cream, salsa, or pickled jalapeños.
For extra crunch, you can also sprinkle crushed tortilla chips or thinly sliced radishes right before serving.
How can I prevent the tortillas from becoming soggy during baking?
Solution: Lightly toast the tortillas in a dry skillet for 30–45 seconds per side before layering.
This removes excess moisture and creates a slight barrier that keeps the stacks firm while baking.
Should I drain the beef after cooking?
It depends on your preference. Leaving a small amount of fat in the skillet adds flavor and helps keep the filling moist.
However, if you prefer a leaner dish or are using beef with higher fat content, drain most of it before adding the chiles and sauce.
Can I make the beef filling in advance?
Yes. You can cook the beef filling 1–2 days ahead, store it in an airtight container in the fridge, and simply reheat before assembling the stacks.
This is a great time-saver for busy days or entertaining.
How do I keep the cheese from over-browning?
Tip: If your cheese starts to brown too quickly while baking, loosely cover the dish with foil for the last few minutes.
This will allow the stacks to heat through while keeping the cheese perfectly melty.
What’s the best way to cut neat slices for serving?
Let the stacks rest for 5 minutes after baking. This allows the layers to set slightly, making it easier to slice clean wedges without everything sliding apart.