Red Chile Beef Enchiladas and Whole Pinto Beans
Red Chile Beef Enchiladas are a celebration of bold Southwestern flavors wrapped in comforting layers. This dish combines tender, shredded roast beef with sautéed onions and melted cheese, all tucked into corn tortillas bathed in smoky Hatch red chile sauce.
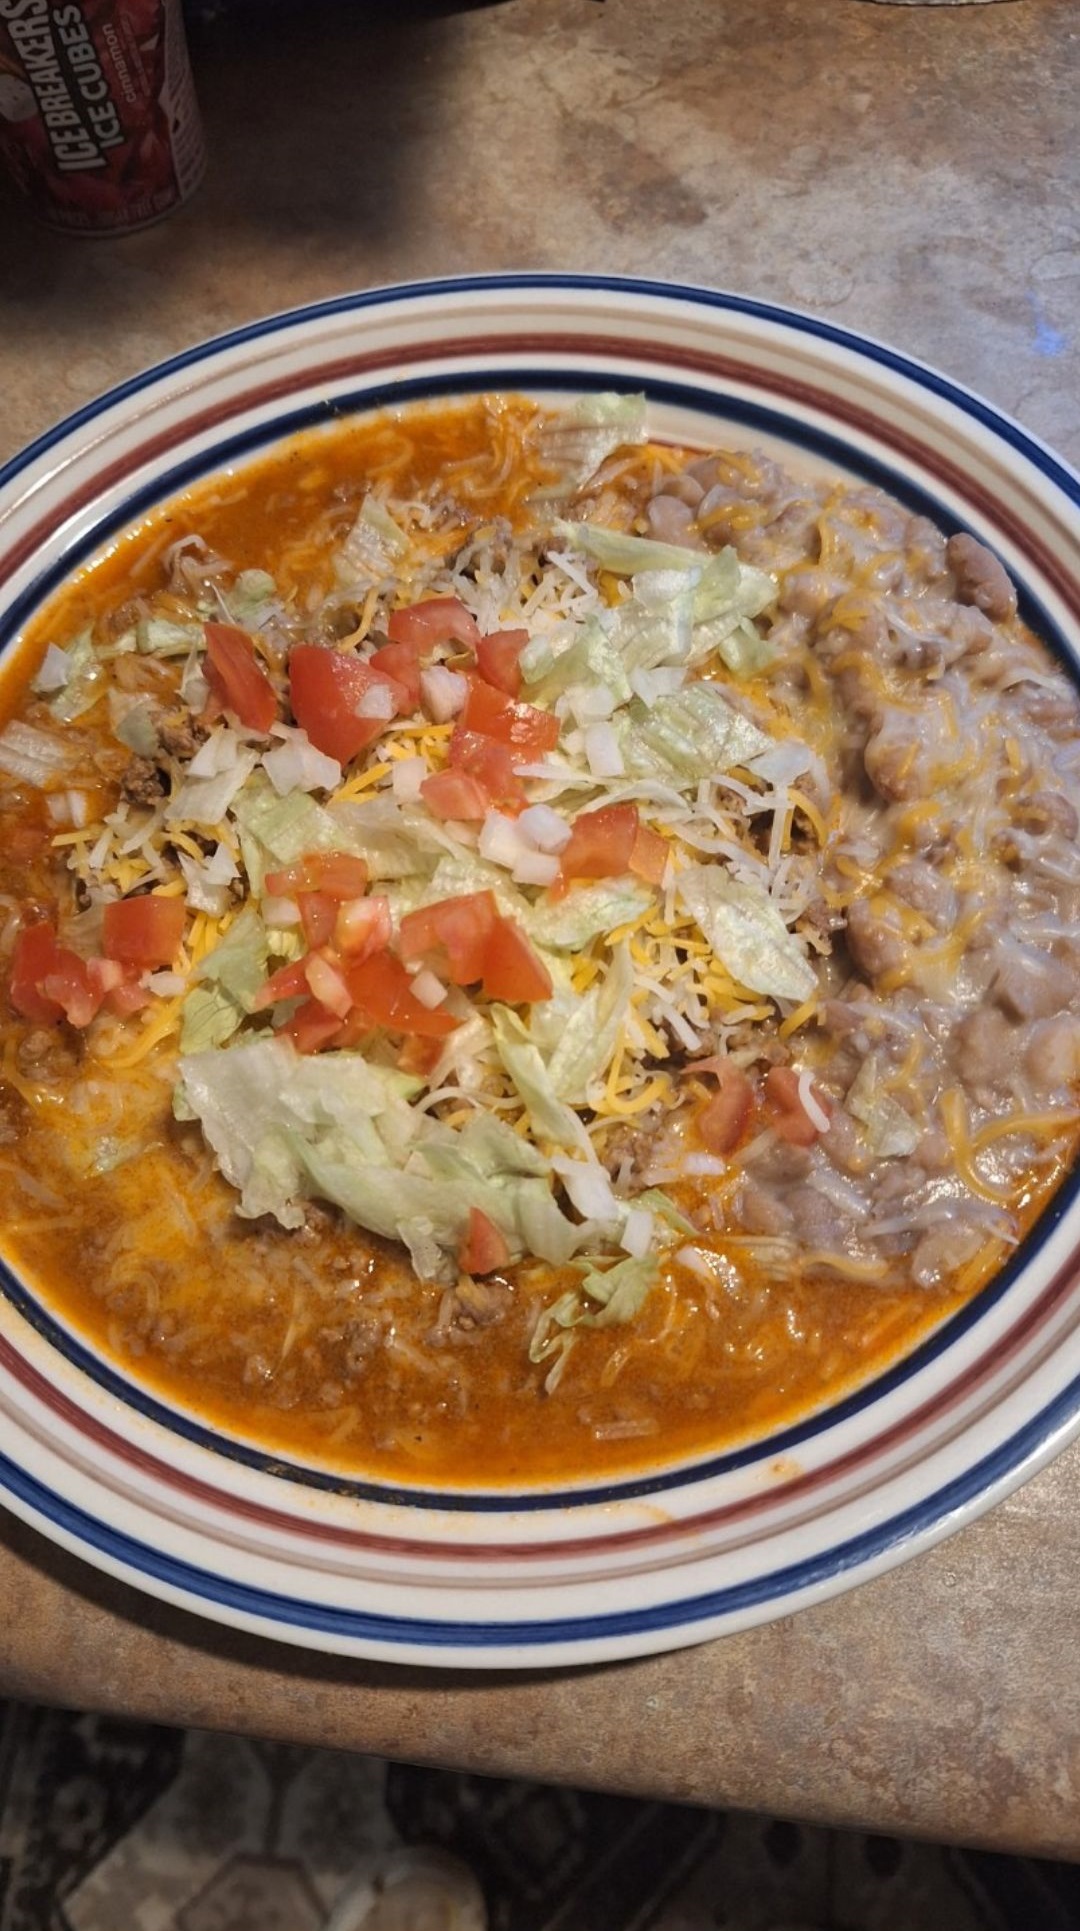
Once baked, the enchiladas emerge bubbling and fragrant, crowned with fresh toppings like crisp lettuce, juicy tomatoes, briny olives, and cool sour cream.
It’s a dish that balances warmth and freshness, heartiness and brightness—perfect for family dinners, potlucks, or anytime you crave authentic comfort food with a vibrant kick.
Why People Will Love Red Chile Beef Enchiladas:
Rich and Bold Flavors – The smoky depth of Hatch red chile sauce blends with tender roast beef and melted cheese, creating layers of flavor that are both comforting and exciting.
Authentic Southwestern Experience – These enchiladas capture the essence of classic Mexican and New Mexican cuisine, making every bite feel like a taste of tradition.
Perfect Balance of Comfort and Freshness – The hearty beef-and-cheese filling is complemented by fresh toppings like crisp lettuce, juicy tomatoes, and cool sour cream, adding brightness and crunch.
Versatile for Any Occasion – Whether served as a weeknight family dinner, a potluck crowd-pleaser, or a festive holiday dish, enchiladas always bring people together around the table.
Customizable Heat Level – By choosing mild, medium, or hot Hatch chile sauce, this recipe can please spice lovers or those who prefer a gentler flavor, making it adaptable to all palates.
Visually Inviting – The bubbling cheese, vibrant red sauce, and colorful garnishes create a dish that looks just as irresistible as it tastes.
Key Ingredients:
Shredded Roast Beef – Tender, slow-cooked beef is the heart of the dish, providing a rich, meaty base that absorbs the flavors of the chile sauce beautifully.
Hatch Red Chile Enchilada Sauce – The soul of the recipe, this smoky, slightly spicy sauce delivers authentic Southwestern character and ties all the components together.
Mexican Cheese Blend – A melty combination of cheeses that adds creaminess, saltiness, and that irresistible gooey pull in every bite.
Corn Tortillas – Traditional and earthy, corn tortillas bring authenticity and structure, soaking up the sauce while holding the filling together.
Fresh Garnishes – Crisp lettuce, ripe tomatoes, briny olives, chopped cilantro, and cool sour cream create layers of freshness and contrast against the warm, cheesy enchiladas.
Expert Tips:
Warm the tortillas before dipping in sauce – Lightly heat the corn tortillas on a skillet or in the microwave wrapped in a damp towel. This prevents cracking when rolling and allows them to soak up the chile sauce without breaking apart.
Use high-quality Hatch chile sauce – The flavor of your enchiladas depends heavily on the sauce. Look for Hatch red chile sauce (mild, medium, or hot depending on preference) or make a homemade version for a deeper, smoky authenticity.
Layer flavors into the filling – When mixing the shredded beef, sautéed onions, and cheese, season lightly with salt, pepper, or even a pinch of cumin for extra depth. A squeeze of lime juice can brighten the richness.
Don’t skimp on the sauce – Coat each tortilla generously in sauce before rolling, and pour extra over the top. This not only infuses the tortillas with flavor but also keeps them moist during baking.
Balance with fresh toppings – The baked enchiladas are hearty and rich, so the fresh garnishes are not just decoration—they cut through the richness and provide texture contrast. Always add them just before serving.
Let them rest before serving – After baking, allow the enchiladas to rest for about 5 minutes. This helps the sauce settle and makes slicing and serving easier without everything falling apart.
How to make Red Chile Beef Enchiladas
Ingredients:
3 cups roast beef, shredded
2 tablespoons butter
1 small onion, diced
2 cups grated Mexican Cheese Blend plus 1 more cup for topping
1 (15 ounce can) Hatch Red Chile Enchilada Sauce (Gluten-Free)
8 – 10 Corn Tortillas
2 cups shredded lettuce
1 cup chopped tomatoes
1 cup cilantro leaves, chopped
1/2 cup sliced black olives
1/4 cup sour cream
Instructions:
Shred roast beef and set aside. In a small non-stick skillet melt butter.
Add onions and cook until translucent about 3 – 5 minutes. Set aside and allow onions to cool.
In a large mixing bowl add shredded beef, sautéed onions, and 2 cups of the shredded Mexican cheese blend. Mix until combined.
Pour enchilada sauce into a flat bowl. Dip tortillas into sauce and fill corn tortillas with shredded beef and cheese mixture.
Roll stuffed tortillas evenly. Line casserole dish with stuffed corn tortillas until filled. (8 -10) enchiladas to fill a 9 x 13 casserole dish)
Pour remaining enchilada sauce over enchiladas. Sprinkle with cheese.
Bake in a 350 degree F. over for 20-25 minutes. Garnish with chopped lettuce, cilantro, tomatoes and sliced black olives. Finally top with a few dollops of sour cream.
Important Notes When Making Red Chile Beef Enchiladas
Tortilla choice matters – Corn tortillas are traditional and provide the best flavor, but they can be fragile. If they tear easily, you can briefly fry them in a thin layer of oil before dipping in sauce to strengthen them. Flour tortillas work too but will give the dish a softer, less authentic texture.
Beef preparation – This recipe shines with leftover roast beef, but you can substitute with brisket, shredded chuck roast, or even ground beef if that’s what you have. The key is well-seasoned, tender meat that pairs with the chile sauce.
Cheese quality – Use freshly shredded cheese rather than pre-packaged shreds, which often contain anti-caking agents that prevent smooth melting. The creaminess of freshly grated cheese elevates the entire dish.
Sauce absorption – Enchiladas absorb sauce as they bake. If you prefer them extra saucy, keep a bit of additional enchilada sauce warmed on the side for drizzling at serving time.
Bake covered, then uncovered – For a gooey yet golden finish, cover with foil for the first 15–20 minutes of baking to prevent drying, then uncover for the final 5 minutes so the cheese bubbles and browns slightly.
Serving style – Enchiladas are best served hot out of the oven, but they can be reheated the next day. To preserve texture, reheat in the oven rather than the microwave.
How to Enjoy This Red Chile Beef Enchiladas After Cooking
Let it Rest Before Serving
Once out of the oven, allow the enchiladas to rest for about 5–10 minutes. This cooling time helps the sauce settle into the tortillas, keeps the layers intact, and makes serving easier.
Serve with Fresh Garnishes
Top each portion with shredded lettuce, diced tomatoes, sliced black olives, and a sprinkle of cilantro. The contrast between the hot, cheesy enchiladas and the cool, crisp toppings elevates every bite.
Add Creamy Balance
A dollop of sour cream or even Mexican crema adds a cooling richness that balances the bold chile sauce and hearty beef.
Pair with Classic Sides
Serve alongside Mexican rice, refried beans, or elote (Mexican street corn) for a complete meal. The sides round out the dish while keeping the spotlight on the enchiladas.
Don’t Forget the Extras
Keep extra enchilada sauce and lime wedges on the table. A drizzle of sauce keeps the dish saucy, and a squeeze of lime brightens the flavors.
Best with Drinks
Pair with a cold Mexican beer, sparkling water with lime, or a refreshing agua fresca (like hibiscus or tamarind) to complement the rich, spicy profile.
Enjoy Leftovers Smartly
Reheat leftover enchiladas in the oven, covered, to restore their original texture. Top with fresh garnishes right before eating to bring them back to life.
Nutrition Information:
For one serving of Red Chile Beef Enchiladas (based on a 9×13 dish yielding 8 servings):
Calories: 365 kcal | Total Fat: 21 g | Saturated Fat: 10 g | Monounsaturated Fat: 7 g | Polyunsaturated Fat: 1.5 g | Cholesterol: 95 mg | Sodium: 720 mg (depending on enchilada sauce and added salt) | Total Carbohydrates: 22 g | Dietary Fiber: 4 g | Sugars: 4 g | Protein: 25 g
Frequently Asked Questions:
Can I make these enchiladas ahead of time?
Yes! You can assemble the enchiladas in advance and refrigerate them before baking.
Just add an extra 5-10 minutes to the baking time if baking straight from the fridge.
What if I don’t have corn tortillas?
You can substitute corn tortillas with flour tortillas, but be aware that the texture and flavor will differ slightly.
Can I freeze the enchiladas?
Absolutely! Once assembled, cover them tightly with plastic wrap and aluminum foil, and freeze.
To reheat, bake from frozen, adding extra time as needed.
How can I make these enchiladas spicier?
For added heat, incorporate diced jalapeños into the beef mixture, use a spicier enchilada sauce, or add chili powder to taste.
What toppings do you recommend?
Common toppings include shredded lettuce, diced tomatoes, chopped cilantro, sliced black olives, and sour cream.
You can also add avocado or jalapeños for extra flavor!
Do I need to cook the beef before shredding it?
Yes, you should use pre-cooked roast beef.
Slow-cooked or leftover roast works best for shredding.
How do I prevent the tortillas from breaking when rolling?
Lightly warm the tortillas in a skillet or microwave for a few seconds before filling them.
This makes them more pliable and easier to roll.
Can I use a different type of meat?
Yes! Feel free to substitute the roast beef with shredded chicken, turkey, or even a meat alternative like jackfruit for a vegetarian option.
What’s the best way to store leftovers?
Store any leftovers in an airtight container in the refrigerator for up to 3 days.
Reheat in the oven or microwave until heated through.
How can I make the enchiladas healthier?
You can use lean cuts of meat, low-fat cheese, and add more vegetables like spinach or bell peppers to the filling.
Whole wheat tortillas are also a great alternative!
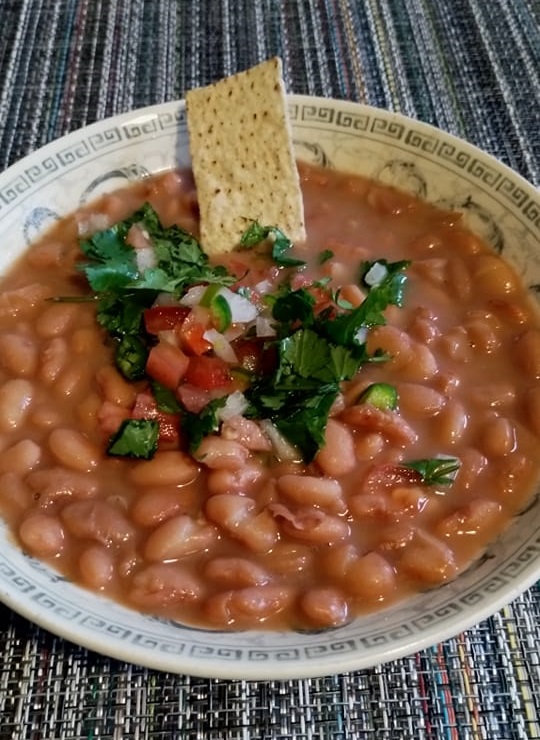
Mexican Pinto Beans (Frijoles de la Olla)
Ingredients
1 pound dried pinto beans
2 tablespoons extra virgin olive oil
1/2 yellow onion, chopped fine
2-3 green onions, white and light green parts chopped fine
3 garlic cloves, minced
1/3 cup chopped fresh cilantro, chopped
1 (4.24 ounce) can chopped green chiles (I use Ortega)
1 fresh jalapeño pepper, stem and seeds discarded – mince half of pepper
4 cups vegetable broth or chicken broth
2 cups reserved water from soaking (add 1/2 cup at a time as needed while cooking)
2 bay leaves
Instructions
Soak the beans overnight in water that . Reserve 2 cups of the water the next day and discard the rest.
Add the oil to a Dutch oven and saute onion for about 3 – 5 minutes or until soft.
Add the green onion, garlic, minced jalapeno and cilantro and cook another minute or two.
Add the soaked beans, 2 cups reserved soaking water, green chilies, the other half of jalapeno, chicken broth and bay leaves.
Bring to a boil then reduce heat to low and simmer.
Cook for an hour covered then cook another hour uncovered. Make sure to add more broth or water if needed.
Cook a little longer for softer beans.
Season to taste with salt and freshly ground black pepper
Remove bay leaves and jalapeno half and serve.
Notes:
Soaking the Beans: Soaking the pinto beans overnight helps to soften them and reduce cooking time. Reserving some of the soaking water enhances the flavor and richness of the broth.
Aromatic Base: Sautéing the onions until soft and translucent forms a flavorful base for the beans. Adding green onions, garlic, minced jalapeño, and cilantro further enhances the aromatic profile of the dish.
Green Chiles and Jalapeño: The addition of canned chopped green chiles and fresh jalapeño (half minced and half added whole) provides a mild, yet distinctive heat to the beans. Adjust the amount of jalapeño to control the spiciness.
Cooking Process: Bringing the beans to a boil and then simmering over low heat ensures that they cook evenly and absorb the flavors from the broth and aromatics. Cooking covered for the first hour helps soften the beans, while cooking uncovered in the second hour allows the liquid to reduce and thicken.
Consistency: Check the beans periodically during cooking and add more broth or water as needed to maintain the desired consistency. Cooking them longer, especially uncovered, will yield softer beans.
Seasoning: Season the beans with salt and freshly ground black pepper towards the end of cooking to taste. Removing the bay leaves and the half jalapeño before serving ensures a pleasant dining experience without overpowering heat.
Serving: Serve the beans hot, either as a main dish with rice or as a side dish to complement Mexican meals. Garnish with additional chopped cilantro, a squeeze of lime juice, or a dollop of sour cream if desired.
Storage: Leftover beans can be stored in an airtight container in the refrigerator for up to 3-4 days or frozen for longer storage. Reheat gently on the stove, adding a splash of broth or water to loosen them up if necessary.
Nutrition Information:
Serving Size: 1 cup |
Calories: 250 | Total Fat: 6 grams | Saturated Fat: 1 grams | Trans Fat: 0 grams | Cholesterol: 0 milligrams | Sodium: 400 milligrams | Total Carbohydrates: 40 grams | Dietary Fiber: 10 grams | Sugars: 2 grams | Protein: 12 grams | Vitamin A: 4% of the Daily Value (DV) | Vitamin C: 10-15% DV | Calcium: 6-8% DV | Iron: 15-20% DV
Notes
VARIATIONS
Add 1 canned chili in adobo sauce, finely chopped for a smokey flavor and more heat
Add about 2 teaspoons chili powder (for extra heat)
Add chopped tomato
Tips
Soaking Pinto Beans
Place your dried pinto beans in a colander and discard any shriveled and broken pieces, stones and pieces of debris you may find.
Rinse under cold water then transfer beans to a large bowl.
Fill the bowl with water covering the beans by 2 inches or more.
The beans double in size after soaking so give them some room to expand in the water.
Let the beans soak in the bowl at room temperature for 8 hours or overnight.
Quick Soak Dried Beans
If you’re in a hurry and don’t want to soak your beans overnight – you can do a quick-soak method.
• Cover the beans with water (the water should be about 2 inches above the beans).
• Bring the water and beans to a rapid boil, then turn the flame off and let the beans sit in the hot water for about an hour.
• Then cook as usual, checking on your beans every 30 minutes while they’re cooking and add more water or broth if needed.
How Long Does It Take To Cook Pinto Beans
There’s two methods of soaking pinto beans – either in a bowl of water for 8 hours or overnight, or the quick soak method in a pot of hot water for an hour.
After they have been pre-soaked they can be cooked in a pot on the stove (I like to use a Dutch oven), in an Instant Pot or in a slow-cooker (Crock Pot).
Frequently Asked Questions:
How long should I soak the dried pinto beans?
It is recommended to soak the dried pinto beans overnight in water. This helps to soften the beans and reduce the cooking time.
If you prefer a quicker method, you can also do a “quick soak” by bringing the beans and water to a boil for 2 minutes, then removing from heat and letting them soak for 1 hour.
Can I use a different type of bean instead of pinto beans?
Yes, you can use other types of beans such as black beans or kidney beans if you prefer.
The cooking time and water-to-bean ratio may vary slightly, so adjust accordingly and follow the instructions on the package for soaking and cooking those specific beans.
Can I make this recipe in a slow cooker?
Yes, you can adapt this recipe for a slow cooker. After sautéing the onions, garlic, and other ingredients, transfer everything to a slow cooker along with the soaked beans, reserved soaking water, broth, and bay leaves.
Cook on low heat for 6-8 hours or on high heat for 3-4 hours until the beans are tender. Adjust the liquid as needed.
How can I add more flavor to the beans?
While this recipe provides a flavorful base, you can enhance the flavor by adding spices such as cumin, oregano, or smoked paprika.
You can also incorporate additional vegetables like diced bell peppers or carrots. Experiment with seasonings and ingredients to customize the taste to your liking.
Can I make a larger batch of beans and store them for later use?
Absolutely! Pinto beans are great for meal prepping. Simply double or triple the ingredients to make a larger batch.
Once cooked, let the beans cool completely, then store them in airtight containers or freezer bags in the refrigerator for up to 5 days or in the freezer for up to 3 months.
Thaw frozen beans in the refrigerator overnight before reheating.
Can I use canned pinto beans instead of dried beans?
While dried pinto beans are traditionally used in this recipe, you can substitute them with canned pinto beans.
If using canned beans, rinse and drain them before adding them to the recipe. Reduce the cooking time accordingly since canned beans are already cooked.
How can I make the beans cook faster?
To reduce the cooking time of dried pinto beans, you can use a pressure cooker.
Follow the instructions of your pressure cooker for cooking pinto beans, which usually involves adding the ingredients, sealing the cooker, and cooking under pressure for a shorter time compared to stovetop simmering.
Can I omit the jalapeño and green chiles if I prefer milder beans?
Yes, you can omit the jalapeño and green chiles if you prefer milder beans or if you don’t have them on hand.
The beans will still have a delicious flavor from the other ingredients. If you enjoy a bit of spice, you can add a pinch of red pepper flakes or a dash of hot sauce to add some heat.
What can I serve the pinto beans with?
Mexican Pinto Beans are versatile and can be served in various ways. They can be enjoyed as a side dish alongside rice, tortillas, or as a topping for tacos, burritos, or nachos.
They can also be used as a base for soups or stews, or mashed and spread on toast as a hearty breakfast option.
Can I freeze the cooked beans for later use?
Absolutely! Cooked pinto beans can be frozen for future use. Allow the beans to cool completely before transferring them to airtight freezer-safe containers or bags.
Label them with the date and store in the freezer for up to 3 months.
Thaw the beans in the refrigerator overnight before reheating on the stovetop or in the microwave.